
How to flash the firmware
What you need
- OpenShock hub
- A Chromium based web-browser (Chrome, Edge, Opera, etc.) Firefox will not work since it doesn't support Web Serial
- Our Flashtool
Important
Ensure you have a cable that supports data transfer, and neither the port nor cable is damaged.
If you received your hub from an OpenShock hardware vendor, you can likely skip this step! Any updates can be performed wirelessly after the initial setup.
Flashing the firmware
Connect your hub
Plug your hub into your PC using a USB cable.
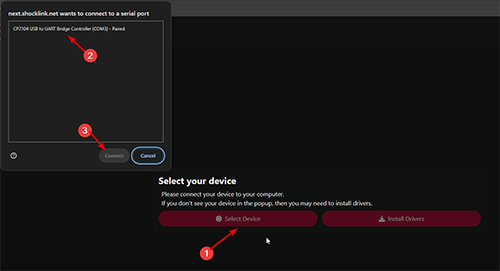
Open the Flashtool
Open the Flashtool and click "Select Device", then select your hub in the popup window. If your hub is not showing up, click "Install Drivers" first, then retry.
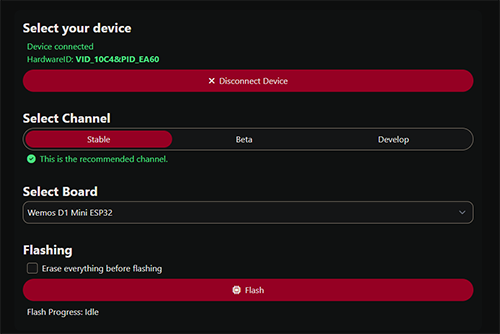
Flash
Press Flash and let it do its thing. Keep the window open — it will tell you when it's done.
First Setup
When everything went well, your board will restart and you should be able to run through the First Setup steps to configure your hub and link it to your shocker.
(Optional) If you have issues after flashing, try again with "Erase everything before flashing" enabled.
Troubleshooting
(Re-)Install Driver
- Download drivers from here CP210x Universal Windows Driver
- Extract the zip file
- Run the
CP210xVCPInstaller_x64.exeinstaller file
Different Cable
Try a couple of different USB cables, USB ports on your computer and if available on a different machine entirely.
Manually start bootloader
Depending on the driver or board, your computer may fail putting the ESP32 into a flashable state.
Most boards will have a pair of buttons. The first button labelled "Boot", "IO0", or even just "B". The second labelled "Reset", "RST", or "EN".
First, attempt flashing while holding down "Boot".
If that doesn't work, try holding down "Boot" and then tapping "Reset". That will reboot the ESP32, and also enter the bootloader, making it ready to receive new firmware!
Sometimes, you may need to both enter the bootloader manually and hold down "Boot" while starting the flashing process.
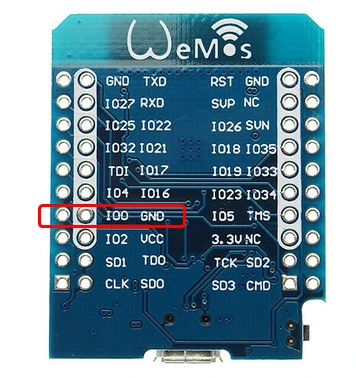
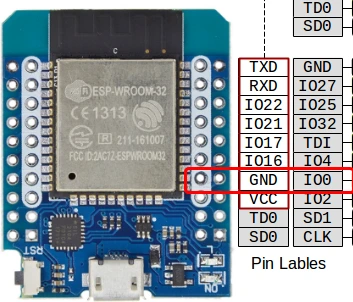
If you don't have a button, you can still usually short GPIO 0 to Ground while booting to enter the bootloader (for most ESP32s).
Extra tip for ESP32-S and -C boards!
On some boards without firmware, you won't see a Serial port until you enter the Bootloader manually using the two-button steps above!
Example pins for the Wemos D1 Mini
Manually flash using esptool.py
- Download esptool (for windows the file is called something like
esptool-vx.x.x-win64.zip) - Download firmware .bin for your board
- Extract the esptool zip file
- Move the downloaded firmware
.binfile into the folder withesptool.exe - Open a command line (
cmdorpowershell) in that folder - Execute the command
esptool write_flash 0x0 OpenShock_xxx-name-xxx.bin. Replace firmware name with your actual file name. - Wait for it to complete flashing and you should be ready to go!
Manually flash using espflash (alternative to esptool.py)
- Download via GitHub here (or if you have Rust's cargo installed, you can run
cargo install espflash). - Download firmware .bin for your board
- Extract espflash
- Move the downloaded firmware
.binfile into the folder withespflash.exe - Open a command line (
cmdorpowershell) in that folder - Execute the command
espflash write-bin 0x0 OpenShock_xxx-name-xxx.bin. Replace firmware name with your actual file name. - Wait for it to complete flashing and you should be ready to go!
Still not working?
Try again, if you still got problems after following this guide join our discord and we will see how we can help you!
Last updated on